

Blog

Brooki Opens in Melbourne!
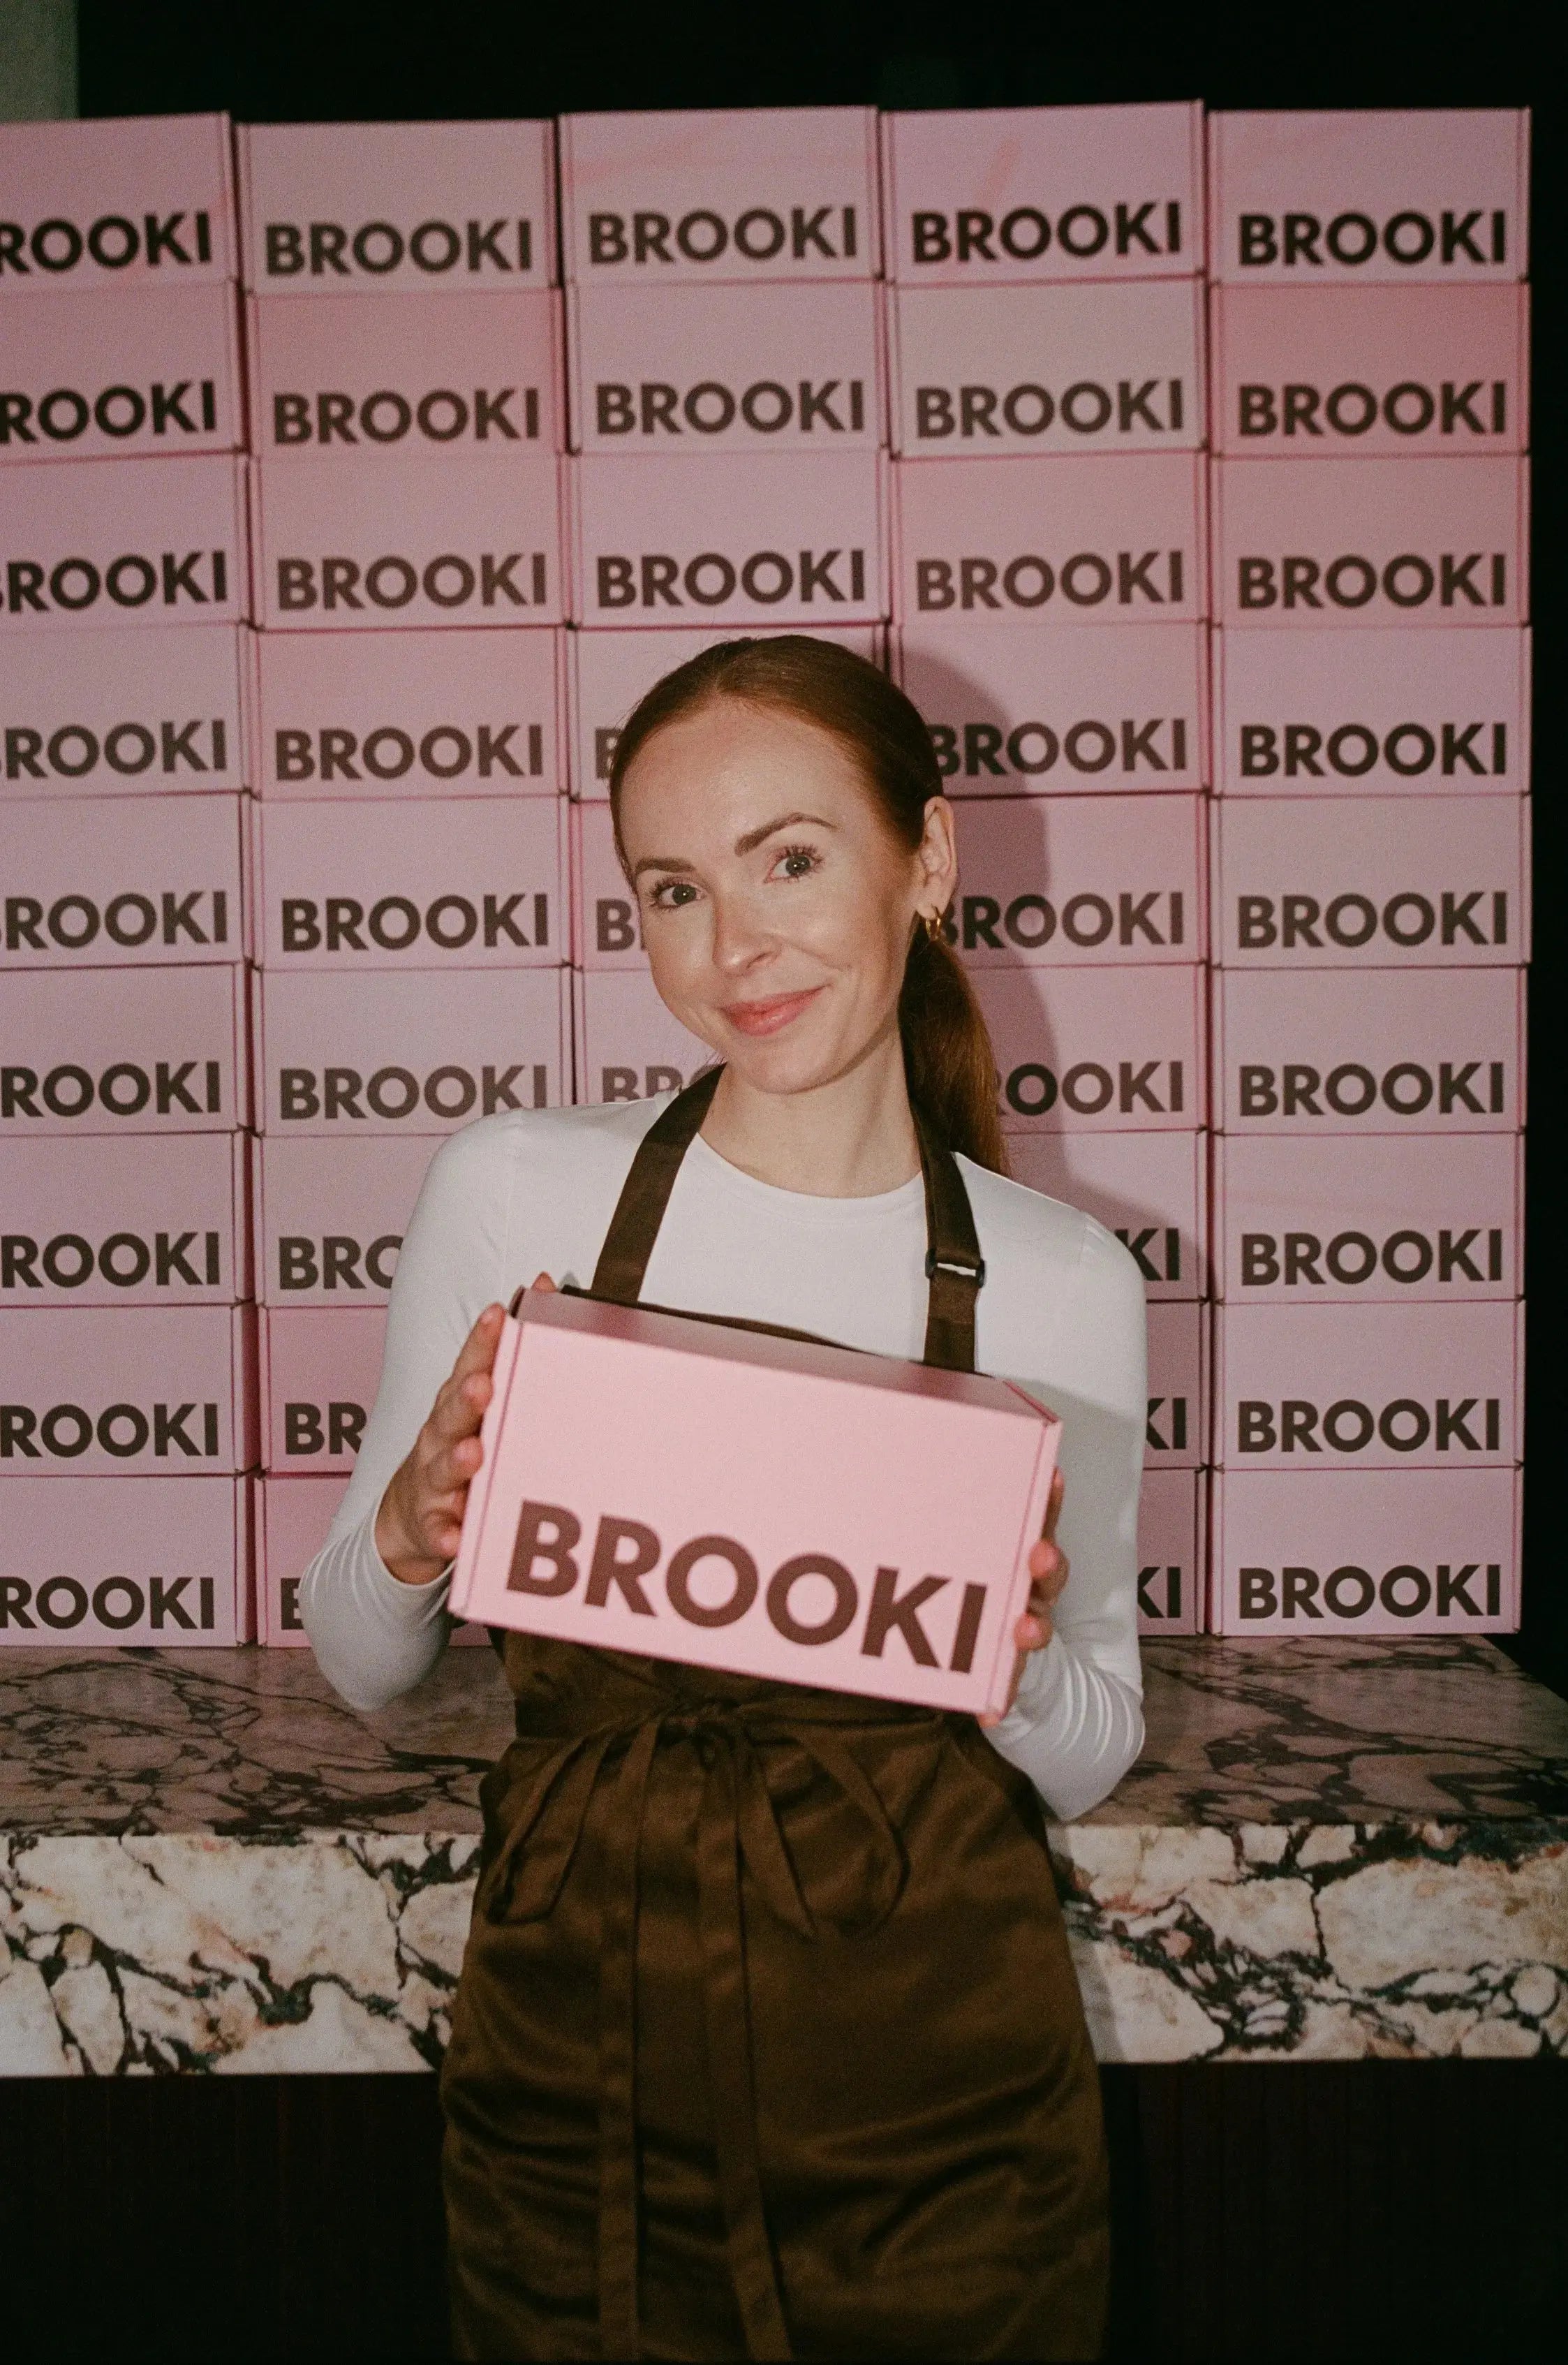
Thursday May 7. Mark it. Circle it. Set seventeen alarms. Brooki Bakehouse is officially opening the doors at Chadstone — Australia's biggest shopping centre and, as of Thursday, home to a very serious amount of cookies. Doors fly open at 9:00am sharp. This is our first Victorian store and honestly? We're losing it. The DMs. The comments. The "WHEN ARE YOU COMING TO MELBOURNE" replies under literally every post for the last twelve months. We heard you. Loud and clear. And now we're here. what's going down on opening day Opening day at Brooki has its own kind of energy. Here's what to expect when you rock up: I'll be there. Yep — I'm flying in for opening day. Come say hi, take a photo, tell me which cookie got you through last winter. Meeting our community in real life is the best part of all of this, and I don't want to miss a single one of you. Free Brooki merch for the first 100 in line. If you've been eyeing the merch on socials, this is your moment to bag it. The full Brooki cookie range, plus a few seasonal specials only available on opening day (did someone say Carrot Cake Cookie!?!?) a friendly word of warning We're not going to pretend the queue isn't going to be a thing. It will be. Our Brisbane and Gold Coast openings had lines snaking through the centre, and Melbourne — based on the noise you've been making — is going to bring the same energy. We love it. We're ready for it. But we want to set you up to win. So: if there's a flavour you've had your heart set on — your Nutella, your Biscoff, your Cinnamon Roll Cookie — come early. We restock every day but on opening day, certain flavours fly out faster than we can replace them. why chadstone Australia's largest shopping centre. 550+ stores. About a million people walking through every week wondering what to eat. It made too much sense. You'll find us in the centre with trays coming out all day, the smell hitting you from about three stores away. We've built the space to feel like every Brooki — warm, a little chaotic, full of cookies and good vibes. see you Thursday Thursday May 7. 9:00am. Chadstone. Bring a friend. Bring your appetite. Bring a little patience for the queue (we promise it's worth it). And come early if you've got your eye on a specific flavour — first 100 in line walk away with merch, and the rest of you walk away with the best cookie of your life. We cannot wait to feed Melbourne. Big love, Brooke + the Brooki team
Learn more
How to Make Your Own Buttermilk at Home
If you’ve ever been halfway through a recipe—say, whipping up a batch of our fluffy Red Velvet cupcakes—and realised it calls for buttermilk, you’re not alone. It’s one of those ingredients we don’t always keep stocked in the fridge and often isn't worth buying a whole carton just for one recipe. But here’s the good news: making homemade buttermilk is super easy, and it only takes a couple of minutes. You most likely have all of the ingredients in your fridge and pantry already! At Brooki Bakehouse we use buttermilk in some of our cupcake recipes so we often need to have it on hand in bulk. But at home, you're likely to only need a small amount. So, let’s break down exactly how to make your own buttermilk substitute whenever you need it. What is Buttermilk, Anyway? Buttermilk isn’t actually buttery at all. Traditionally, it was the tangy liquid left behind after churning cream into butter. Today, the buttermilk you find in stores is usually cultured milk—slightly thick, with a signature tang that makes baked goods extra tender and flavourful. It makes for a delicious addition to cakes and cupcakes, particularly vanilla and red velvet. In recipes, buttermilk: Reacts with baking soda to help your cakes rise beautifully Adds a subtle tang that balances sweetness Keeps bakes soft, moist, and never dry How to Make Buttermilk (2 Easy Methods) Here’s the quick fix to make your own buttermilk recipe at home in just a few simple steps. Remember: room temperature ingredients always! Method 1: Lemon Juice + Milk 1 cup (240ml) whole milk 1 tablespoon fresh lemon juice Method 2: Vinegar + Milk 1 cup (240ml) whole milk 1 tablespoon white vinegar or apple cider vinegar Simply stir the milk and acid together, let it sit for 5–10 minutes until slightly thickened and curdled, and you’ve got a perfect buttermilk substitute ready to use. Brooki’s Pro Tips ✨ Whole milk works best in baking, for a full body flavour. Always let the mixture rest before adding it to your recipe—this activates the magic. Scale up the ratios if your recipe calls for more buttermilk. Always use room temperature milk so the thickness can develop fully. Why You’ll Love This Hack Making your own buttermilk means you’ll never have to make an emergency grocery run again. Plus, it ensures your cakes, cookies, and brownies stay soft, tender, and bakery-worthy—just the way we like them at Brooki Bakehouse. So next time your recipe calls for buttermilk, remember: you’ve already got the secret in your fridge.
Learn more
How to Make Self-Raising Flour
How to Make Self-Raising Flour at Home One of the most common questions from international Brooki readers is how to make self-raising flour yourself at home. We use self-raising flour a lot in the bakery and it is a staple in Australian supermarkets. But we've come to learn that while it might be a staple ingredient on this side of the equator, it isn't as easy to find in some places! Don’t worry—you can whip it up in minutes with pantry staples. Self-raising flour is simply all-purpose flour combined with baking powder. It's that simple! To make 1 cup (125g) of self-raising flour, just mix: 1 cup (125g) all-purpose flour 1 ½ teaspoons baking powder Whisk everything together to evenly distribute the baking powder, and you’re good to go. This DIY version works perfectly in cakes, muffins, biscuits, and any recipe calling for self-raising flour. You can add a sprinkle of salt (1/4 teaspoon) if you're making a savoury item, or skip the salt for your sweet bakes. The best part? Making your own means you’ll always have it fresh, and you can scale the recipe up or down depending on how much you need. Get the Baking Book! You will find 100 recipes from our founder, Brooke Bellamy, inside her debut cookbook Bake with Brooki. An instant best-seller, this book is filled with recipes from Brooke's childhood, as well as a decade in commercial kitchens as a self-taught baker. Each recipe is easy to follow and even easier to eat! Buy the book now.
Learn more
Red Velvet Cupcakes
There's just something so irresistible about red velvet cupcakes! They've been our best selling cupcake flavour in the bakery since we opened the doors to Brooki, so we figured what better Brooki Bakehouse recipe to share with you all. Red Velvet is a flavour that is hard to describe but when done right, is the perfectly balanced cupcake sponge topped with delicious, glossy cream cheese frosting. Many red velvet cupcake recipes are similar with little to no variation, but there are a few handy baking tips to make sure you get that bakery quality every single time. Baker's tips for Red Velvet Cupcakes 1. Always sift your cocoa powder. This is an ingredient I make sure to always sift, as it often forms little clumps that will not break down in the mixing process (and result in clumps of cocoa in your cupcake!) 2. Room temperature ingredients are key. To ensure a smooth even batter, always use room temperature eggs, butter and buttermilk. 3. Real buttermilk is best! For that delicious crumb you find in a bakery cupcake, real buttermilk is best (you can buy it in the supermarket near the milk). That said, you can always make your own following our quick substitute in the recipe below. 4. Use gel food colouring (not liquid). This ensures a strong red colour. I recommend Americolor or Chef Master brands. 5. Bake at a lower temperature. Compared to other cakes, red velvet are better baked at a lower temperature. If your oven runs hot, you might even consider baking 5 degrees lower, to ensure the sponge doesn't rise too quickly. Red Velvet Cupcakes Prep time: 15 minutes Cook time: 18-20 minutes Servings: 12 cupcakes Ingredients For the cupcakes: 160g plain flour 2 tbsp corn flour 1 1/2 tsp cocoa powder, sifted 1 tsp bicarbonate of soda 1/2 tsp salt 45g unsalted butter, room temperature 180g caster sugar 120ml vegetable oil 2 eggs (large), room temperature 1 1/2 tsp vanilla extract 2/3 tsp white vinegar 1 tsp red food colouring (gel), I recommend Americolor or Chef Master 110ml buttermilk (if you don't have buttermilk, you can easily make it with this substitution!) For the cream cheese frosting: 225 Cream Cheese, room temperature 100g unsalted butter, room temperature 1 tsp vanilla extract 300g icing sugar, sifted Method: Step 1 Preheat oven to 170 degrees C. Line a 12-cup cupcake pan with cupcake liners (white is fine but I find red gives them an extra pop!) Step 2 Place the flour, cornflour, cocoa powder, bicarbonate of soda and salt together in a bowl and whisk to combine, then set aside. Step 3 In the bowl of a stand mixer with the paddle attachment, beat the butter and the sugar on high speed until light and fluffy. This should take about five minutes. Scrape down the sides of the bowl to ensure there are no clumps, then slowly pour in the oil and beat on low speed until combined. Step 4 Beat in the eggs, vanilla, vinegar and food colouring on low speed, until just combined. Step 5 Use an ice-cream scoop to evenly portion the batter between the 12 cupcake liners. I like to fill them a little over half way. If you don't have an ice cream scoop, two metal spoons will work just fine (see a tutorial here). Bake for 18-20 minutes (I like to keep an eye on them from 16 minutes as my oven runs hot). Step 6 While the cupcakes are baking, prepare the cream cheese frosting by placing the cream cheese and butter in the bowl of a stand mixer and beating on medium speed until smooth, around 3-5 minutes. Add the vanilla. Slowly add the icing sugar on low speed until fully combined, before increasing to high speed to whip it good! You're looking for a light, fluffy, glossy cream cheese with no clumps that is silky smooth. Ice the cupcakes once completely cool to touch.
Learn more
Brooki Bakehouse to Open new location in Gold Coast
Brooki Bakehouse is opening its first location outside of Brisbane and bringing our signature treats to the Gold Coast! Get ready: Brooki Bakehouse is coming to the Gold Coast! The rumours are true! We've heard your calls, and we're absolutely thrilled to announce some seriously sweet news: Brooki Bakehouse is officially opening our first store outside of Brisbane, on the Gold Coast! Our first location outside of Brisbane That's right, after years of serving up our famous chunky cookies, best-selling brownies, and signature treats to our amazing Brisbane community, we're packing our ovens and heading south to bring the Brooki magic to the Gold Coast. And where better to set up shop than in the heart of it all – the iconic Pacific Fair Shopping Centre! For so long, we've received messages, comments, and even in-person pleas from our Gold Coast customers asking when we'd finally make the move. Your passion for our gooey centres, crispy edges, and decadent flavours has been truly overwhelming, and we couldn't be more excited to finally make your sweet dreams a reality. Get ready to experience the Brooki difference! We're bringing our full menu of irresistible goodies, including: Our legendary Chunky Cookies: From classic chocolate chip to innovative flavour combinations you won't find anywhere else, these are the cookies that started it all. Prepare for a mouthful of pure indulgence. The Best-Selling Brownies: Fudgy, rich, and utterly addictive. Whether you're a fan of classic dark chocolate or crave something a little more adventurous, our brownies are guaranteed to satisfy your sweet tooth. Signature Treats: Think loaded blondies, decadent cookie bars, and other delightful creations that are perfect for a little pick-me-up or a special treat. We've been working hard behind the scenes to create a beautiful new space within Pacific Fair where you can come and experience the Brooki Bakehouse atmosphere firsthand. Expect the same warm welcome, the same mouthwatering aromas, and of course, the same exceptional quality you've come to know and love. We can't wait to become a part of the vibrant Gold Coast community and share our passion for all things baked and delicious. Keep your eyes peeled for our official opening date – we promise it's coming soon! Follow us on our social media channels for sneak peeks, updates, and details on Opening Day giveaways! Gold Coast, get in line! We can't wait to see you at Pacific Fair these July school holidays. Brooki Bakehouse Gold Coast details Location: Pacific Fair Opening date: July 2025 This news was first announced on Instagram. Follow Brooki Bakehouse on socials to stay up to date with new store openings!
Learn more
Baking Equipment Every Baker Needs
Whether you're a brand new beginner or a seasoned home baker looking to refine your setup, having the right equipment is key to success. This guide will walk you through the best baking equipment every baker needs, from must-have basics to helpful upgrades. Discover the best baking tools to invest in, understand their importance, and unlock your full baking potential. Top 10 Essential Baking Equipment 1. Sifter If there's one bakery item that gets used every day, it's our sifting machine. For home bakers a sifter is an essential item for sifting ingredients that clump together - because no one wants a crumb of dutch cocoa powder or baking powder in their bite of a cupcake! Take note, however, that not all ingredients need sifting. You can skip the flour, but always sift your icing sugar for a smooth buttercream. Buy now $9.29 2. Stand Mixer It’s no secret a stand mixer will make your baking days easier and more efficient. But that doesn't mean you have to race out and buy the most expensive mixer on the market. The best mixer is the one you can afford, so be sure to shop around! Buy now $738 3. Cake Tins As far as cake tins go, there are certain brands and materials that are way better than others. Fat Daddio's is a personal favourite, known for their anodized aluminum pans (which results in even heating and durable pans that will last a lifetime). Buy now $24.99 4. Macarons Mats If you ask me what my favourite thing to bake is, macarons would win every time. There’s just something so therapeutic about making them! Perhaps it is the concentration required to get them right, which allows you to totally switch off your mind from anything else. Having a pair of macaron mats is essential to making perfect macarons that are uniform every time. Join me for my macaron masterclass if you’d like to bake along with me and get my fail-proof recipe! Buy now $28.99 5. Soaker Bottle If you’ve ever wondered how cake decorators keep their cakes fresh by making them in advance, you need to know about sugar soaking! This soaker bottle is the perfect way to soak your cakes with simple syrup to increase their lifespan. Buy now $40 6. Oven Mitts As a baker, oven mitts are an essential part of your tool kit. For me, oven mitts are kind of like shoes for fashion people - I just can’t buy enough of them! These oven mitts from Amazon come in a bunch of colours at an affordable price, so stock up! Buy now $14.99 7. Kitchen Scale In the bakery I always measure everything in grams. For bakers and pastry chefs this is pretty normal, as it ensures more accuracy in baking. If you plan on developing recipes, it is a great habit to adopt as early as possible and these small kitchen scales are the perfect addition to your home kitchen. Buy now $18.99 8. Offset Spatula If there’s one thing in my baker’s tool kit I could not live without, it’s an offset spatula. I use these nifty tools to ice and stack all of my cakes, as well as decorating them. Buy now $11.66 9. Cake Turntable Another cake decorating tool I cannot live without is my cake turntable. Investing in a sturdy turntable is a no brainer if you ask me, especially when you’re making tens of cakes each day! Buy now $87 10. Fondant letter stamps Finally, these fondant letter stamps have become a staple in our kitchens at the bakery. We use these to stamp the letters for our heart cakes and vintage style cakes, which is how we get those perfect letters on the top of the cakes. Buy now $15.29 View our Online Baking Classes
Learn more
Brooki Buttercream recipe
The Best Buttercream At Brooki we make a tonne of cakes for every kind of celebration. Birthdays, engagements, weddings and gender reveals are some of the most popular cakes we make and we pride ourselves on having some of the best cakes in Brisbane. Every week we're asked about our glossy buttercream and what buttercream recipe we use. There are a bunch of different buttercream recipes you can choose from to decorate your cakes, and every baker has their favourite. Today, we're going to share with you the recipe we use, which is a little different to most! So here it is from start to finish, so you can try the famous Brooki buttercream for yourself from home! @brookibakehouse The Brooki Buttercream Recipe There are various styles of buttercreams that bakeries use to ice cakes. Some of the most popular buttercreams include American buttercream, Swiss Meringue buttercream and Italian Meringue buttercream. At Brooki, we use our own variation of American buttercream to ice our cakes, but there is one key difference in our recipe to the typical style: the butter:sugar ratio. It's this Brooki buttercream recipe that creates the base for all of our cakes at the bakery. This recipe is not only glossy and easy to decorate with, but it is also reacts really well to colour. In the bakery we use Colour Mill for colouring our buttercreams and have found this buttercream acts best to soak up the colour (so we don't have to use too much!) Another recommendation for your buttercream recipe, no matter which recipe you decide to use, is to always sift your icing sugar. No matter what, we always sift the icing sugar before placing it in the mixer for our buttercreams, as the last thing we want to see are big clumps of sugar in an otherwise smooth buttercream. When it comes to crumb coating, we use a more traditional ratio of butter:icing sugar for our American style buttercream, so the centre is nice and sweet (which balances perfectly with the buttery exterior). Brooki Buttercream Recipe Ingredients 500g unsalted butter, room temp 250g icing sugar, sifted 1 tsp vanilla extract Instructions Cube your butter into small 1.5cm squares. Place them in the bowl of a stand mixer and mix on high with the paddle attachment for at least 5-7 minutes, scraping down the sides of the bowl twice every few minutes. Once the butter is glossy and a lighter colour, change the speed of your mixer to the lowest setting and add 1/2 cup of icing sugar at a time, until fully incorporated. Turn the mixer back on to high and continue to beat the buttercream until it is glossy - around 5 minutes. Finally, turn the mixer on to low and add the vanilla. Mix until incorporated. Discover Our Online Baking Classes
Learn more